Journal
- Laravel
- PHP
- JavaScript
- Tutorials
- DevOps
- Baagicha
- AI
- API
- Laravel
- PHP
- JavaScript
- Tutorials
- DevOps
- Baagicha
- AI
- API
- Laravel
- PHP
- JavaScript
- Tutorials
- DevOps
- Baagicha
- AI
- API
- Laravel
- PHP
- JavaScript
- Tutorials
- DevOps
- Baagicha
- AI
- API
- Laravel
- PHP
- JavaScript
- Tutorials
- DevOps
- Baagicha
- AI
- API
- Laravel
- PHP
- JavaScript
- Tutorials
- DevOps
- Baagicha
- AI
- API
- Laravel
- PHP
- JavaScript
- Tutorials
- DevOps
- Baagicha
- AI
- API
- Laravel
- PHP
- JavaScript
- Tutorials
- DevOps
- Baagicha
- AI
- API
- Laravel
- PHP
- JavaScript
- Tutorials
- DevOps
- Baagicha
- AI
- API
- Laravel
- PHP
- JavaScript
- Tutorials
- DevOps
- Baagicha
- AI
- API
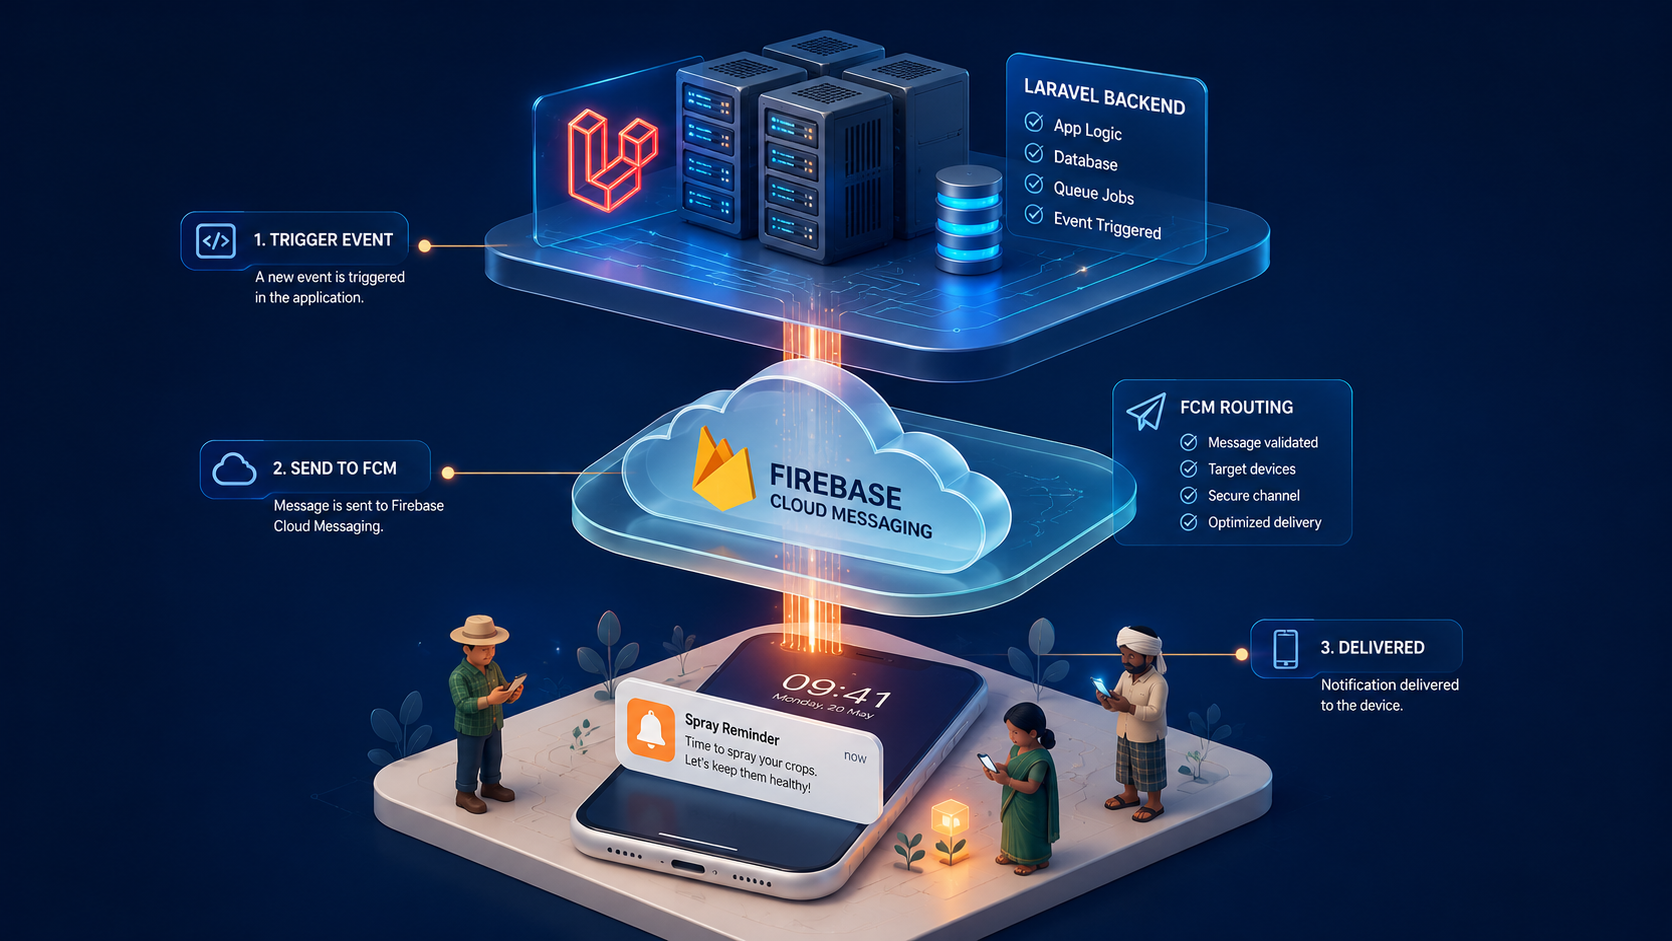
Building a Scalable Push Notification System with Laravel and React Native
Building a Scalable Push Notification System with Laravel and React Native
Notifications are the lifeline of any modern mobile application. Whether it is a spray reminder for a farmer, a weather alert, or an order update, users expect timely, relevant, and actionable notifications delivered seamlessly to their devices. In this guide, I will walk you through a complete, production-ready notification architecture I built for Baagicha — an agritech platform — using Laravel on the backend, Firebase Cloud Messaging (FCM) as the delivery pipe, and React Native on the frontend. The system supports both in-app notification feeds and push notifications, with user preference toggles, queued job processing, and deep-link navigation.
Why a Dual-Channel Approach Matters
Most applications treat push notifications as the default. However, relying solely on push creates a critical gap: users who dismiss or miss a push notification have no way to revisit it. A dual-channel system — database for persistent in-app records and push for real-time alerts — ensures users never miss important updates. The database channel acts as the permanent record, while the push channel handles immediacy. This architecture also simplifies debugging because every notification leaves a trace in the database, regardless of whether the push was delivered successfully.
- Database channel: Persistent, queryable, and visible inside the app.
- Push channel: Real-time, OS-integrated, and works even when the app is killed.
- User preferences: Each user can opt in or out of specific notification types.
- Queued processing: Non-blocking, retryable, and scalable to thousands of users.
System Architecture Overview
The notification flow follows a clear pipeline. Any module in the Laravel backend calls a centralized dispatcher. The dispatcher checks the user’s preferences, then dispatches queued jobs for each enabled channel. The push job communicates with Firebase Cloud Messaging, which delivers the notification to the Android device. The React Native app handles the message differently depending on whether it is in the foreground, background, or killed state. When the user taps a notification, deep-linking routes them to the correct screen.
The pipeline looks like this:
Laravel Backend (Trigger → Dispatcher → Jobs) → Firebase Cloud Messaging → React Native App (Foreground / Background / Killed) → Deep-Link Navigation
All heavy lifting is offloaded to queue workers, so the HTTP response remains fast even when broadcasting to thousands of users.
The Laravel Backend: Sender and Orchestrator
The backend is built around a single entry point: NotificationDispatcher. Every module — whether it is spray reminders, weather alerts, or order updates — calls this dispatcher. It accepts the target user or users, the notification type, title, body, metadata, channels, and priority. It then resolves the users into an array of IDs, checks each user’s preference toggles, and dispatches queued jobs for every enabled channel.
Key design decisions:
send()is for one or a few users.sendBulk()is for mass broadcasts, automatically chunked into batches of 500 to prevent memory exhaustion.- Users without a preference row default to
ALLOW, ensuring backward compatibility.
For convenience, a SendsNotifications trait wraps the dispatcher so any service class can trigger notifications without manually resolving the dispatcher from the service container:
class SprayScheduleService
{
    use SendsNotifications;

    public function sendReminder(User $user, string $message): void
    {
        $this->notifyUser(
            user: $user,
            type: 'spray_reminder',
            title: 'Spray Reminder',
            body: $message,
            data: ['screen' => 'SpraySchedule'],
            channels: ['database', 'push'],
            priority: 'high',
        );
    }
}
Queued Jobs: Why They Are Non-Negotiable
Creating 10,000 database rows or making 10,000 HTTP calls to FCM during a single HTTP request would freeze your application. The system uses two dedicated queued jobs to solve this:
SendDatabaseNotification inserts a row into the notifications table. It wraps the existing NotificationService so existing console commands and event listeners continue to work without modification.
SendPushNotification handles the FCM delivery. It looks up all active device tokens for the target user, builds the FCM payload, and sends it via the kreait/laravel-firebase package. If FCM returns a "token not registered" error, the token is automatically deactivated to prevent future failed attempts. The job is configured with three retry attempts and exponential backoff — 10 seconds, 30 seconds, and 60 seconds — to handle transient network failures gracefully.
💡 Pro Tip: Always run a dedicated queue worker for your notifications queue. Use php artisan queue:listen --queue=notifications during development, and configure a Supervisor process in production.
Firebase Cloud Messaging: The Delivery Pipe
FCM is Google's free push notification infrastructure. Laravel communicates with FCM through the kreait/laravel-firebase PHP package, authenticated using a service account JSON key downloaded from the Firebase Console. The React Native app uses @react-native-firebase/messaging to receive messages.
The critical piece is the device token. When the app launches and the user is authenticated, it requests notification permission, retrieves an FCM token, and registers it with the Laravel backend via POST /api/v1/devices/register. This token is stored in the device_tokens table, linked to the user. FCM uses this token to route messages to the correct physical device. If the token changes — for example, after an app reinstall — a refresh listener re-registers the new token automatically.
React Native: Handling Messages in Every App State
The frontend must handle three distinct scenarios, and each requires a different approach:
- App Killed: The Android OS receives the FCM message directly and shows it in the top drawer. No JavaScript runs. A background message handler, registered before React mounts in
App.tsx, ensures the native layer knows what to do. - App Backgrounded: Same behavior as killed — the OS shows the notification automatically. When the user taps it, the app opens and the navigation handler reads the
data.screenpayload to route to the correct screen. - App Foreground: The OS does not show a banner automatically. Instead, the
onMessagehandler fires in JavaScript. In our implementation, we do not show a toast; we silently refresh the bell badge count so the user sees the update without interruption.
The initialization flow inside AppNavigator.tsx — guarded by an isAuthenticated check — sets up all handlers:
initializePushNotifications();              // Permission → Token → Register
onTokenRefresh((token) => registerFcmToken(token));
onForegroundMessage(() => fetchUnreadCount());
onNotificationOpenedApp((payload) => handleNotificationNavigation(payload));
getInitialNotification().then((payload) => {
  if (payload) setTimeout(() => handleNotificationNavigation(payload), 500);
});
Deep-Linking: From Tap to Screen
Every notification carries a data payload with a screen key. When the user taps a push notification, handleNotificationNavigation() reads this key and routes the user to the correct screen — for example, SpraySchedule or WeatherForecast. The same routing logic applies whether the app was killed, backgrounded, or already open. This creates a seamless user experience where every notification is actionable.
The In-App Notification Center
The notification bell in the global header polls /api/v1/notifications/unread-count every 30 seconds. This interval is frequent enough to feel responsive without draining battery or hammering the server. When the count is greater than zero, a filled bell icon with a red badge is displayed; when zero, an outlined bell is shown.
Tapping the bell navigates to NotificationsScreen, which presents a full-featured notification center:
- Pull-to-refresh and infinite scroll via
FlatList - Mark as read (individual or all)
- Delete individual notifications or clear all read
- Priority color indicators (red, orange, blue, green)
- Unread dot indicators and relative timestamps
State management uses Zustand with selectors to prevent unnecessary re-renders. The old pattern of subscribing to the entire store caused an infinite loop of API calls; the selector pattern ensures components only re-render when the specific slice they consume changes.
Database Schema: Three Tables That Power Everything
The system relies on three core tables:
notifications stores the in-app feed. It includes the user ID, type, title, message, JSON metadata, read status, priority, and timestamps. This table is the source of truth for the notification center.
device_tokens stores FCM tokens. Each row links a token to a user (nullable before login), records the platform, and tracks whether the token is active. Inactive tokens are skipped during push dispatch.
user_preferences stores per-user toggles for each notification type — spray reminders, disease alerts, weather alerts, and more. If a user disables a type, the dispatcher skips them entirely for that notification.
How to Generate a Notification from Any Module
Integrating a new module into the notification system requires minimal code. The recommended approach is to use the SendsNotifications trait:
class WeatherAlertService
{
    use SendsNotifications;

    public function sendFrostAlert(User $user): void
    {
        $this->notifyUser(
            user: $user,
            type: 'weather_alert',
            title: 'Frost Alert!',
            body: 'Temperature dropping to 2°C tonight. Cover your plants.',
            data: ['screen' => 'WeatherForecast'],
            channels: ['database', 'push'],
            priority: 'urgent',
        );
    }
}
For bulk broadcasts — for example, alerting all farmers in a specific district — use sendBulk() on the dispatcher directly, passing a collection of user IDs and a chunk size:
$dispatcher = app(\App\Services\NotificationDispatcher::class);
$userIds = User::where('state', 'Himachal Pradesh')->pluck('id');

$dispatcher->sendBulk(
    userIds: $userIds,
    type: 'weather_alert',
    title: 'Hail Storm Warning',
    body: 'Severe hail expected in Shimla district at 3 PM.',
    data: ['screen' => 'WeatherForecast'],
    channels: ['database', 'push'],
    priority: 'urgent',
    chunkSize: 500,
);
Troubleshooting Common Issues
During development and production, you may encounter specific symptoms. Here is a quick reference:
- No active tokens for user: The device token has a null
user_id. Link it manually or ensure the registration API is called after login. - Push not received but DB notification exists: The FCM token is invalid. The system auto-deactivates invalid tokens, but you should verify
device_tokens.active = true. - Bell badge not updating: Ensure the screen uses
ScreenLayout, which mounts the polling logic. - Infinite API calls: Verify your Zustand selectors. Subscribing to the entire store causes re-render loops.
- Queue jobs stuck: Confirm your queue worker is running on the
notificationsqueue. - Build fails with google-services.json error: Verify the
package_namein the JSON matches theapplicationIdinbuild.gradle.
Key Takeaways
Building a notification system that scales requires more than just sending HTTP requests to FCM. You need a clean dispatch API, queued job processing for resilience, user preference management for respect, and frontend state handling for every app lifecycle state. The architecture described here has been running in production for Baagicha, handling spray reminders, weather alerts, and order updates for thousands of farmers. It is modular enough that any new module can plug into it with a single trait, and robust enough that transient failures do not break the user experience.
If you are building a Laravel and React Native application and need a notification layer, this pattern will save you weeks of iteration. Start with the dispatcher, add the queues, wire up FCM, and iterate on the frontend handlers. The result is a system that just works — whether the app is open, minimized, or completely closed.
Need help architecting notification systems or full-stack mobile applications? Let's talk.
Currently: Senior Engineer @ PrimeGurukul · Learning React Native · Open to freelance projects
Get in Touch
Let's Work Together.
I'm available for freelance projects, consulting, and full-time roles.